Claude Code Deployment Guide
Covers installation, initialization, proxy access, common errors, and the complete deployment process.
Start with the official documentation: docs.claude.com
| 📋 Prerequisite Complete the Node.js installation first and make sure Node.js 18+ is installed correctly. |
|---|
⚡ Read Before Your First Install: Skip the Initialization Error
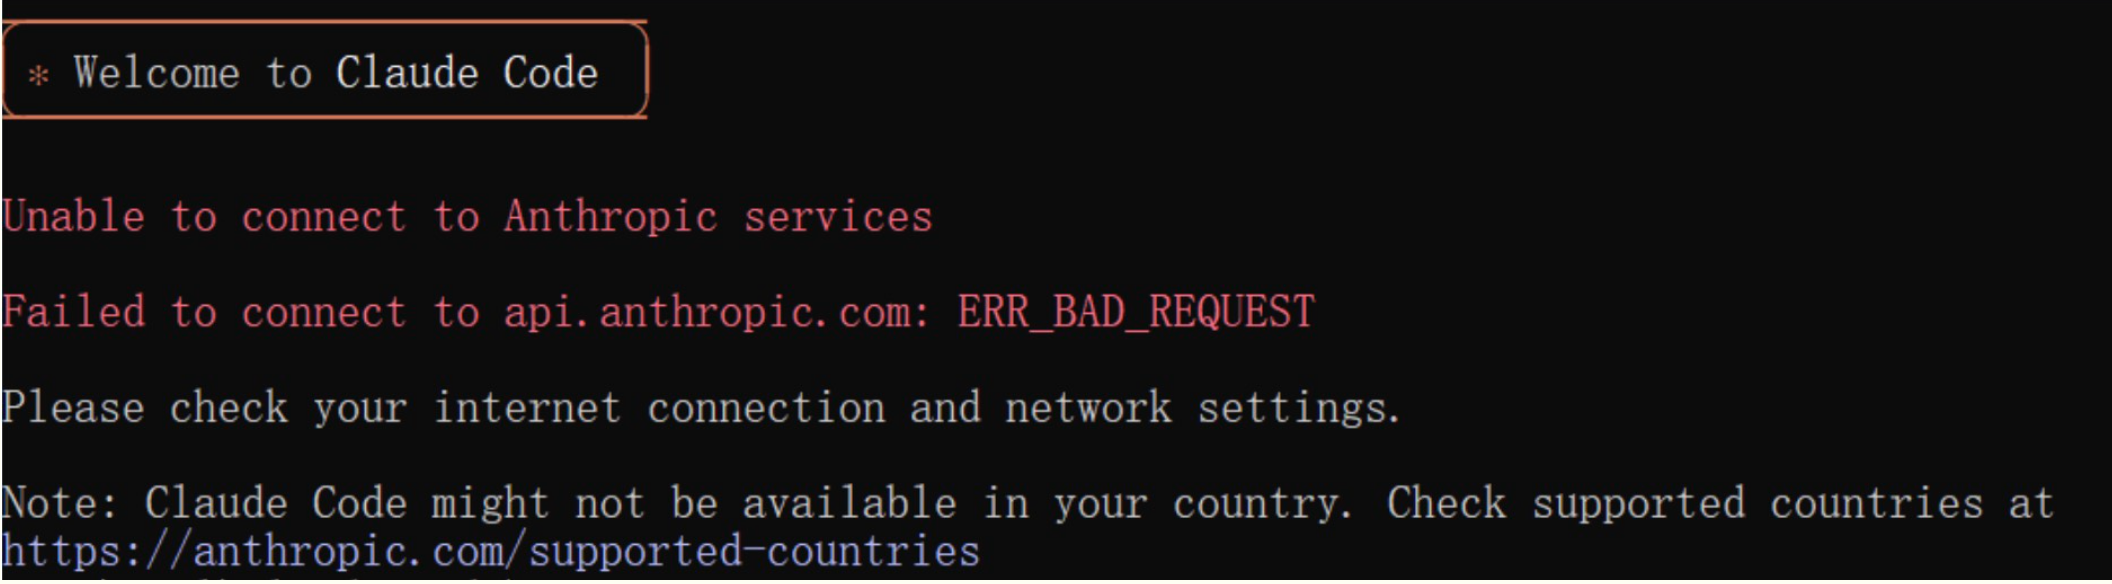
When you use a third-party API gateway, Claude Code displays the following error on its first launch:
 Claude Code first-launch error on a black screen. Red and white text app…
Welcome to Claude Code
Unable to connect to Anthropic services
Failed to connect to api.anthropic.com: ERR_BAD_REQUEST
This happens because Claude Code tries to connect to the official API for an initialization check the first time it starts. A third-party gateway cannot complete this step. After installation and before the first launch, use either method below to skip the check:
Method One: Skip It with CC-Switch (Recommended)
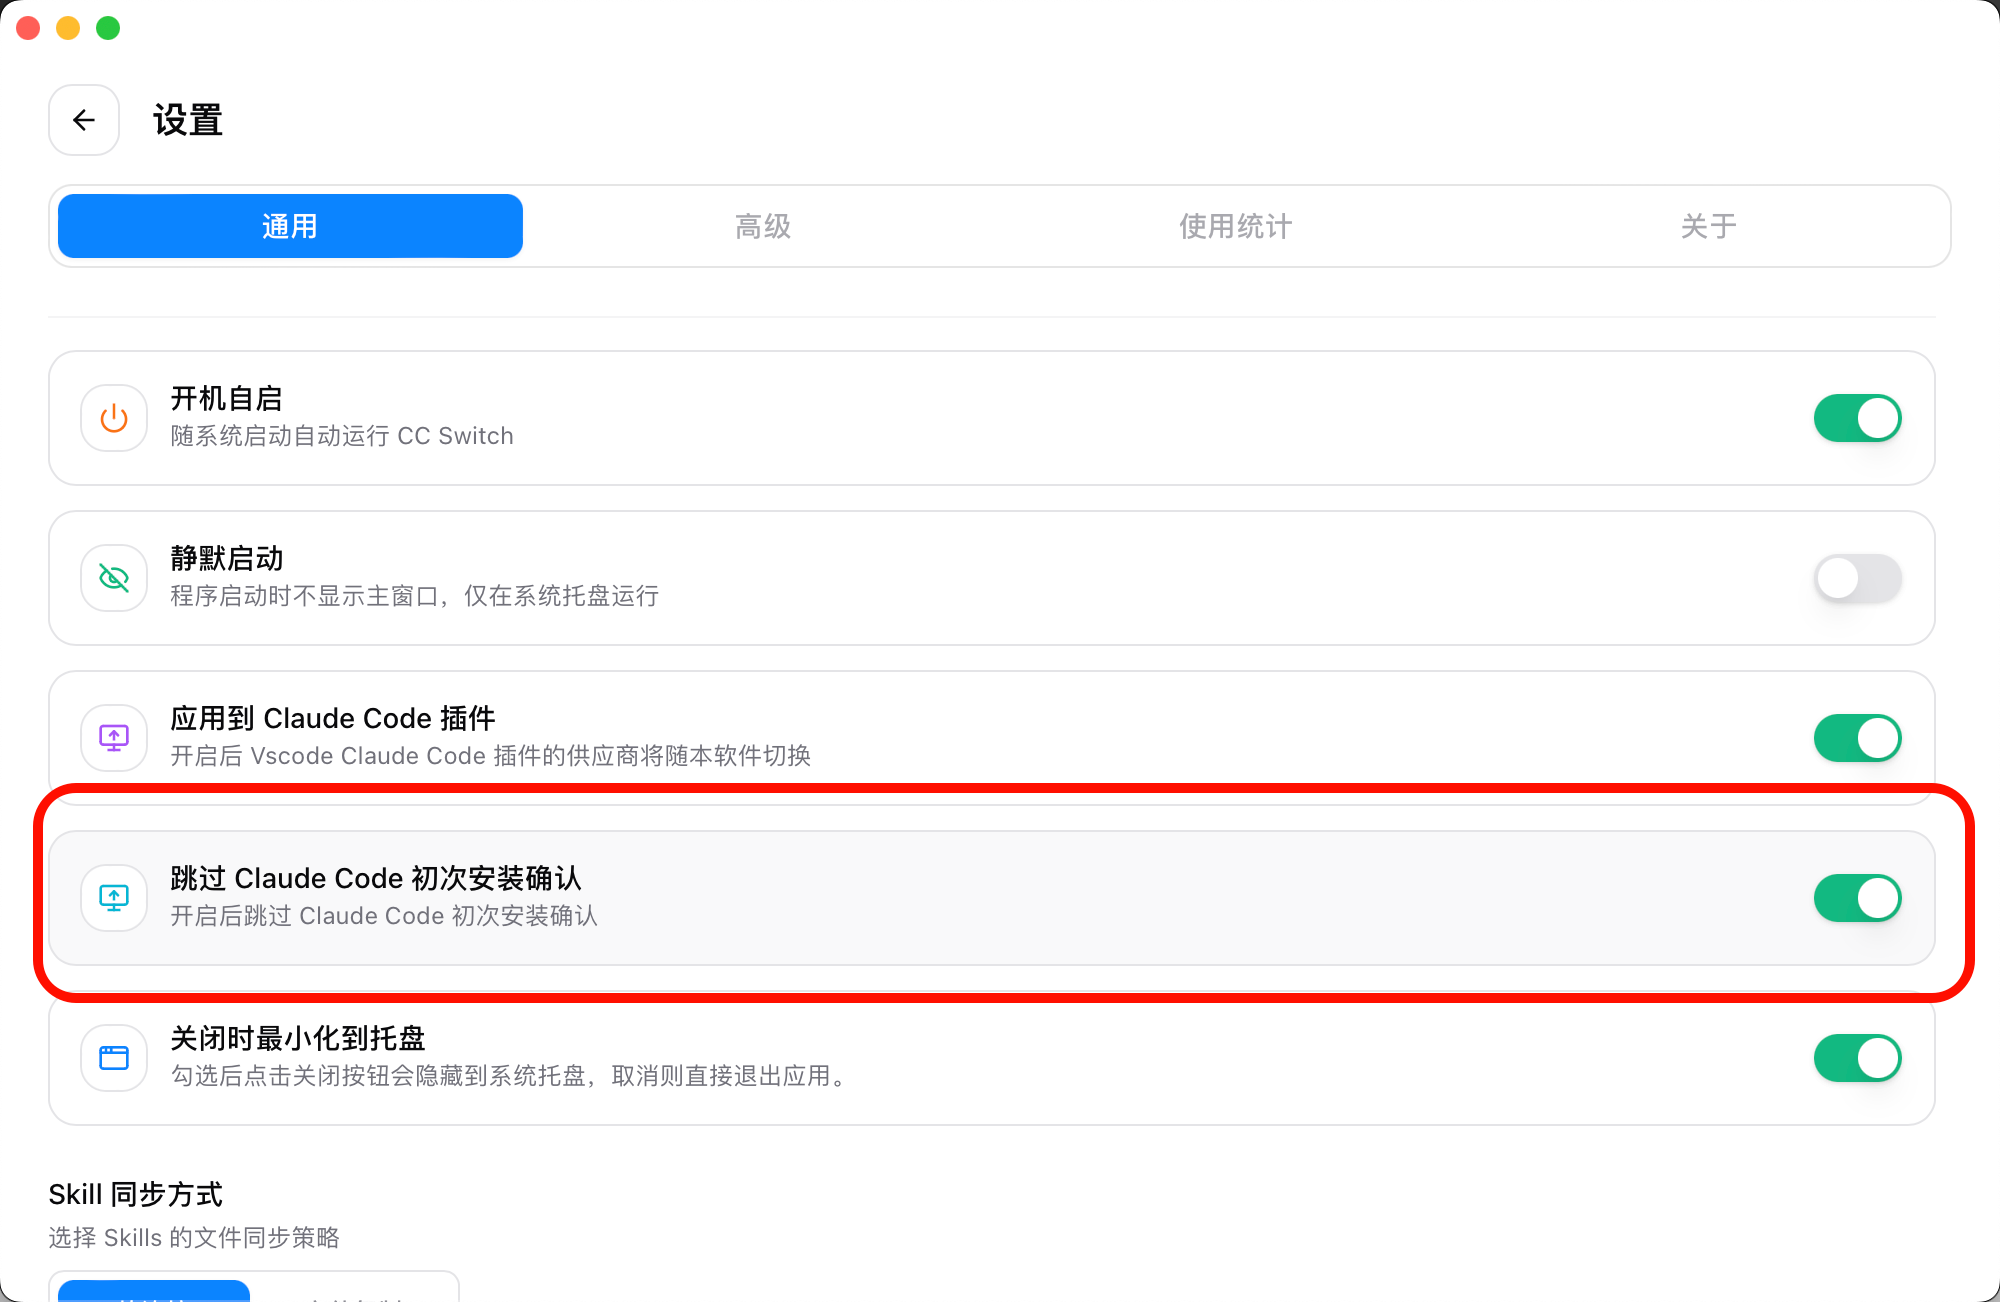
Download the latest installer for macOS or Windows from the CC-Switch download page. Open the CC-Switch configuration tool, go to Settings → General, and enable “Skip Claude Code initial installation confirmation.”
 The General tab on the CC-Switch Settings page. The “Skip Claude Code in…
Method Two: Edit the Configuration File Manually
Find the ~/.claude.json file in your home directory and add the "hasCompletedOnboarding": true field at the end:
| ⚠️ Keep the JSON valid Before adding the field, add a comma after the previous field. Otherwise, invalid JSON will prevent Claude Code from starting. |
|---|
{
"installMethod": "unknown",
"autoUpdates": true,
"firstStartTime": "2025-07-14T06:11:03.877Z",
"userID": "xxxx",
"projects": {
"/home/your-user": {
"allowedTools": [],
"history": [],
"mcpContextUris": [],
"mcpServers": {},
"enabledMcpjsonServers": [],
"disabledMcpjsonServers": [],
"hasTrustDialogAccepted": false,
"projectOnboardingSeenCount": 0,
"hasClaudeMdExternalIncludesApproved": false,
"hasClaudeMdExternalIncludesWarningShown": false
}
},
"hasCompletedOnboarding": true
}
Save the file, then run claude again to start using it normally.
| Reference: Skip Claude Code’s initialization check |
|---|
🚀 Quick Setup with CC-Switch (Recommended)
If you have installed the CC-Switch quick configuration tool, you can manage Claude Code through a graphical interface without manually editing configuration files or environment variables.
Why Use CC-Switch
- Simple, intuitive graphical interface
- Switch between provider configurations with one click
- Automatically manages environment variables and configuration files
- Supports configuration backup and restore
- Switch configurations without restarting your terminal
Configuration Steps
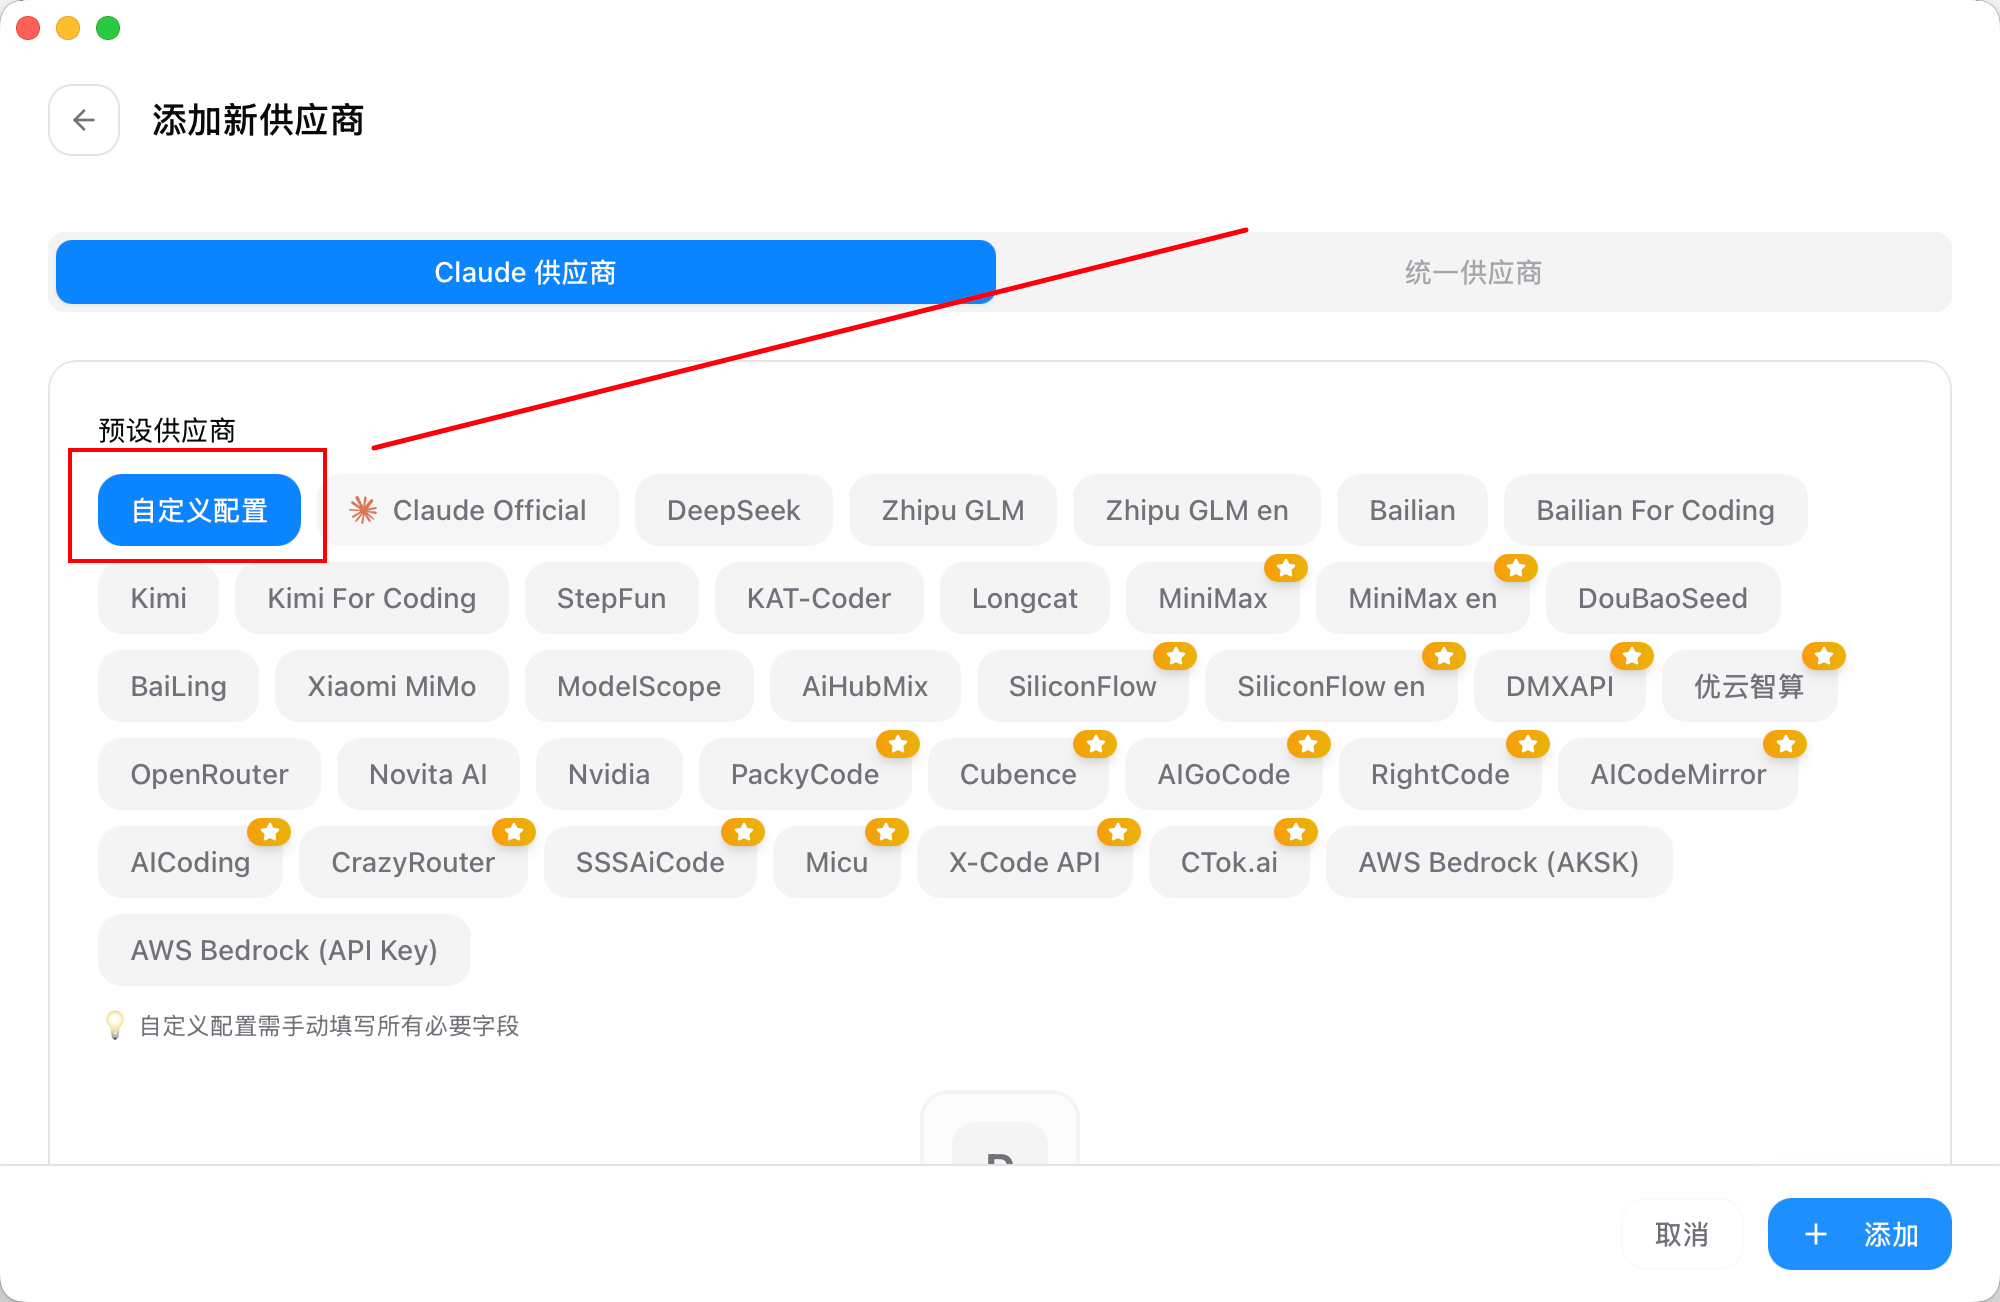
- Launch CC-Switch and add a Claude Code configuration
 The Add Configuration screen in CC-Switch. Tabs for “Claude Provider” an…
- Open the CC-Switch application
- Click the “Claude” tab at the top
- Click the orange “+” button in the upper-right corner to add a configuration
 The Add Configuration screen in CC-Switch. The API Key field contains a…
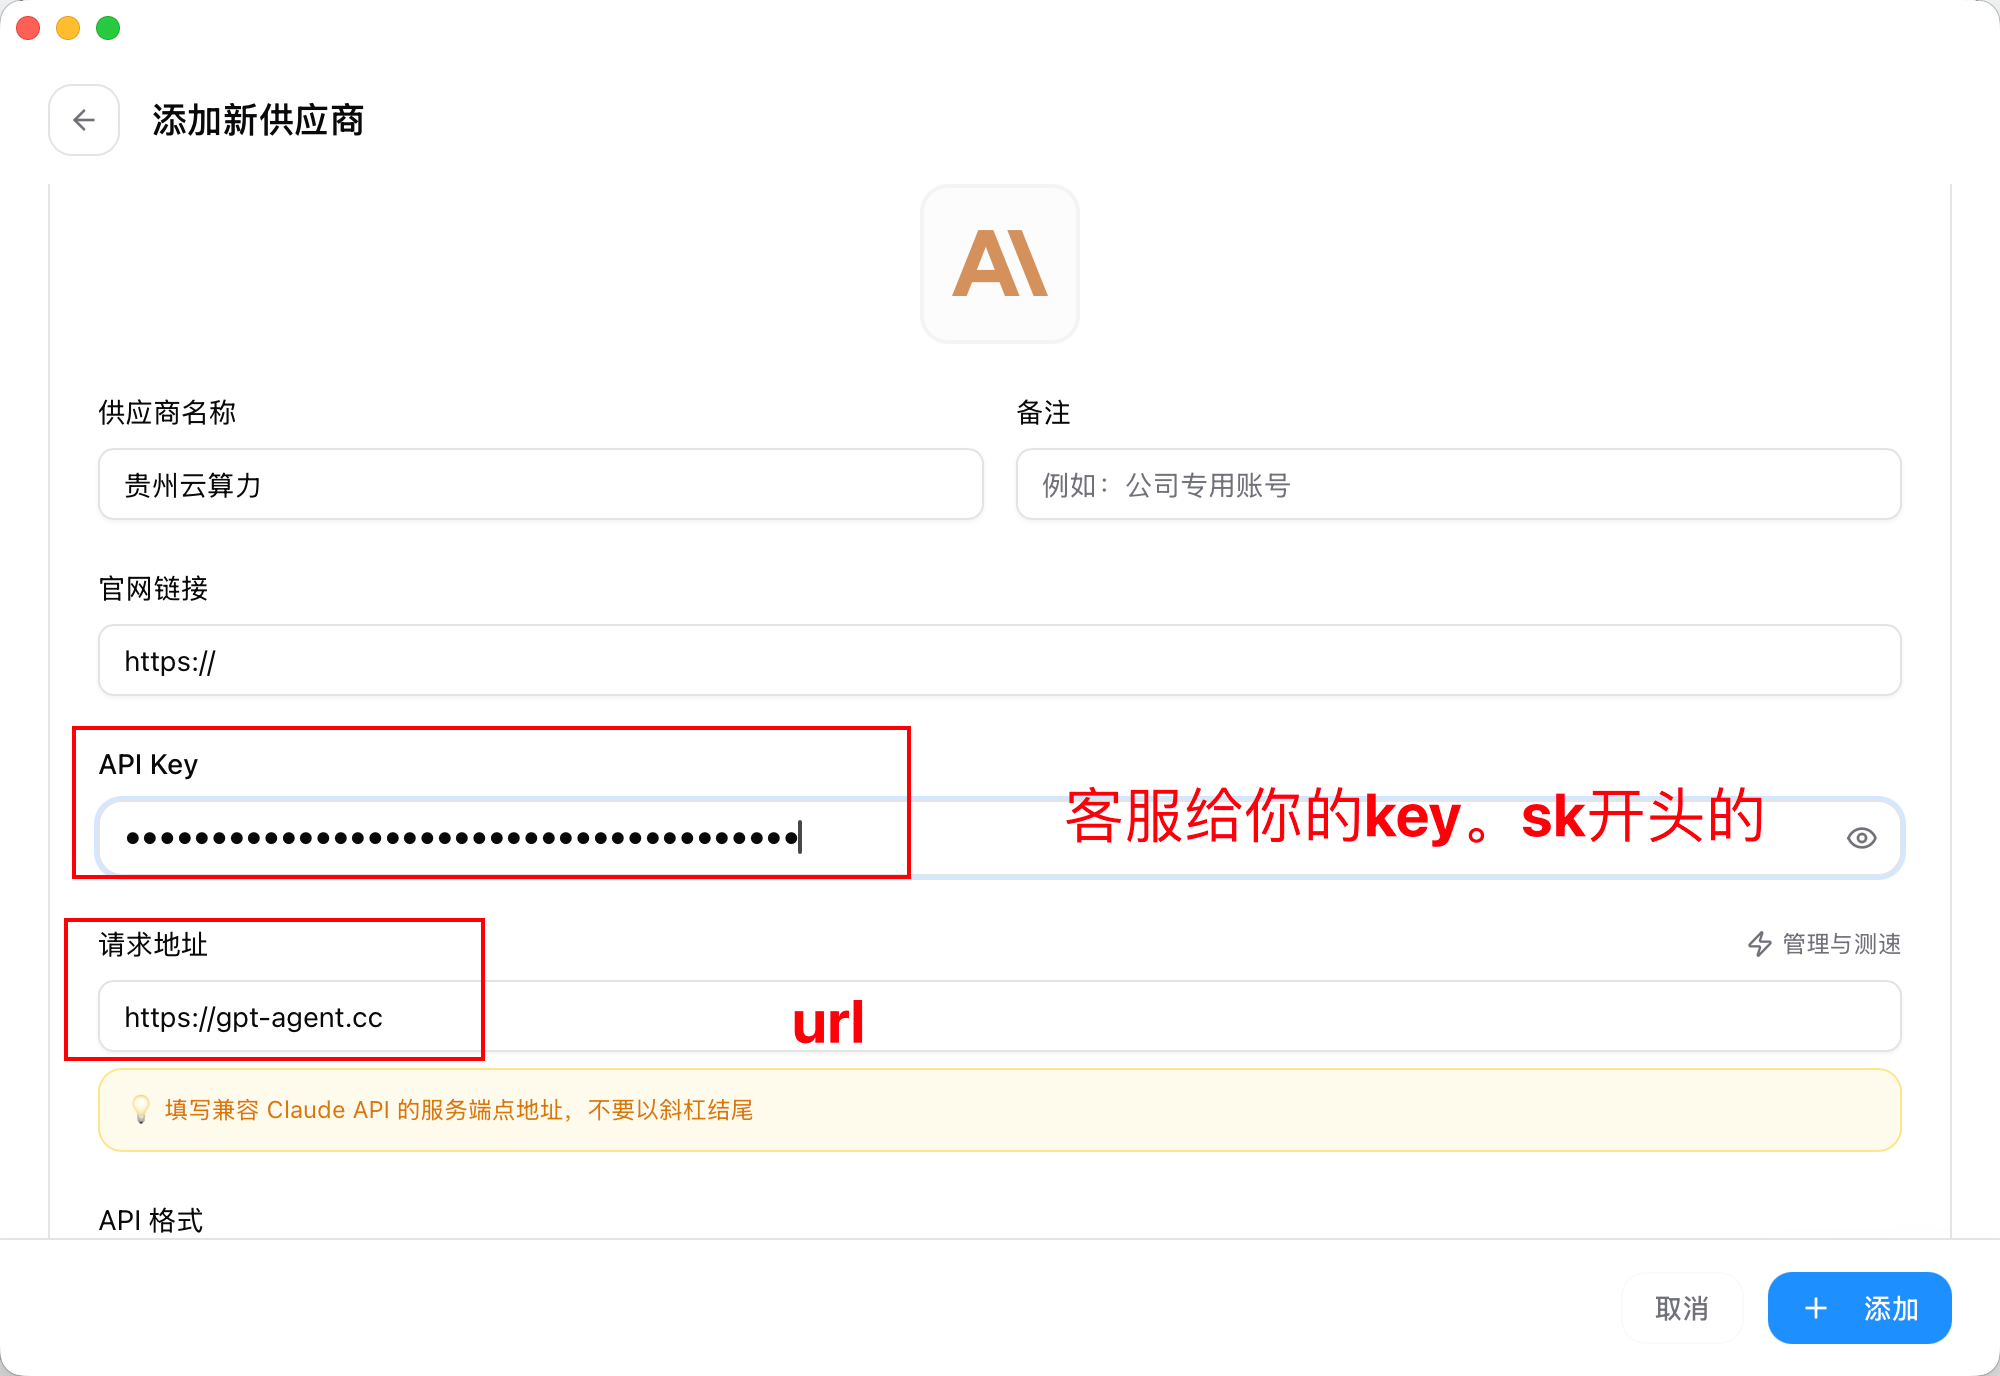
- Enter the provider information
- Provider name: Enter a custom name (for example, "LLM API Gateway")
- API Base URL: Enter https://api.llm-token.cn
- API Key: Paste the Claude-specific key you received from the platform
- Model: Select an available Claude model based on your needs
- Click “Save”
💡 Tip
|
- Enable and use the configuration
- Find the “gptagent” configuration you just created in the configuration list
- Click “In Use” on the right side of the configuration, or click the configuration card itself
- The configuration will be marked “In Use” with a green label
- Restart Claude Code to apply the new configuration
- Switch quickly from the system tray
CC-Switch lets you switch configurations from the system tray:
- Right-click the CC-Switch icon in the system tray
- Select the Claude category from the menu
- Select the configuration you want to use
- The configuration takes effect immediately without opening the main window
⚠️ Important
|
Configured but Unable to Chat?
Try the steps below. If the issue persists, contact support.
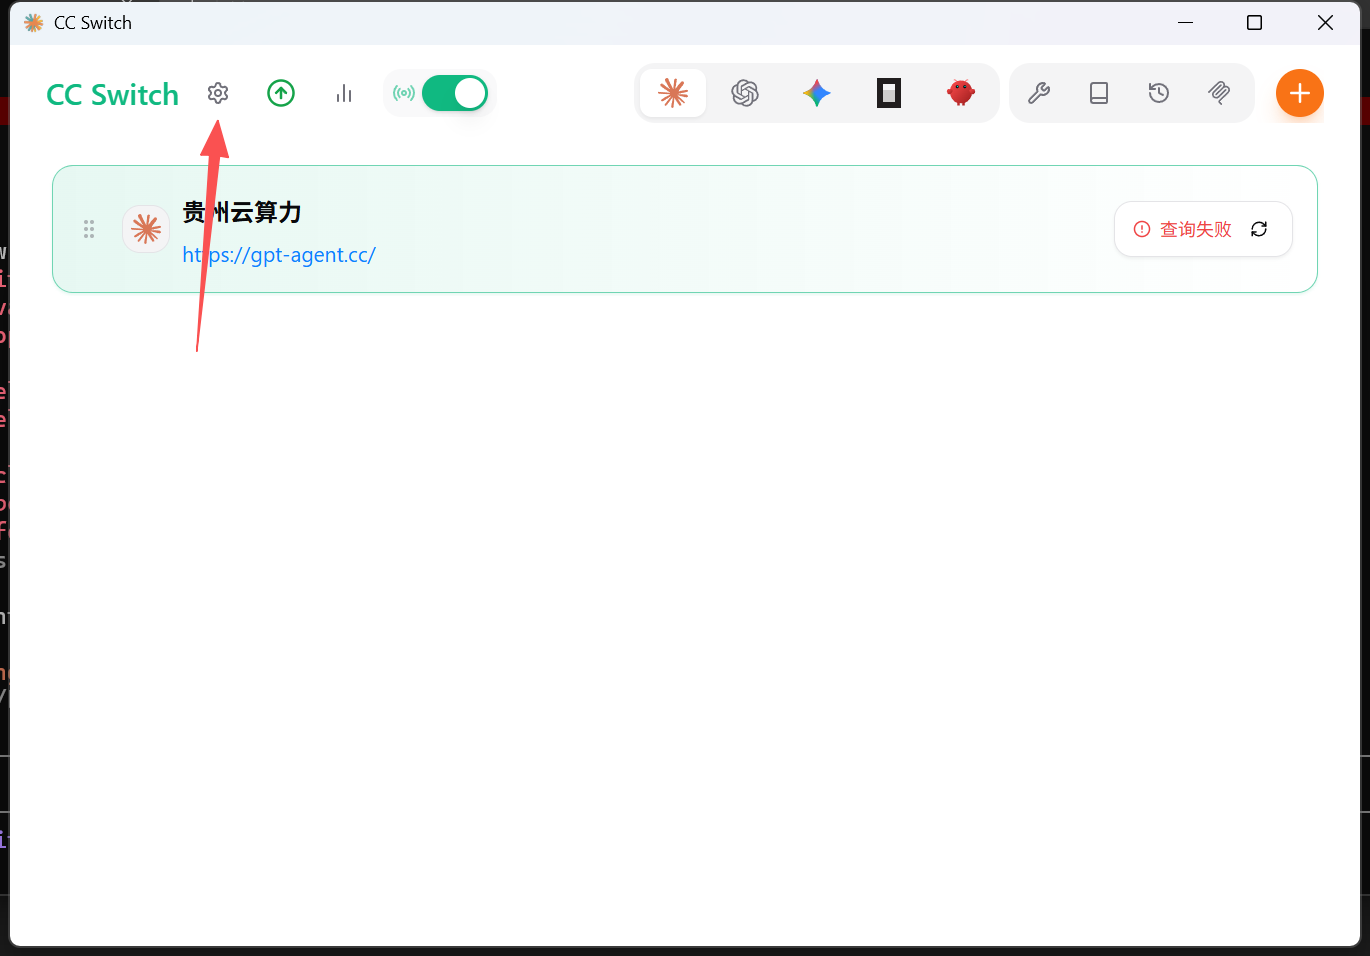 The CC Switch interface with the “LLM API Gateway” option on the left in…
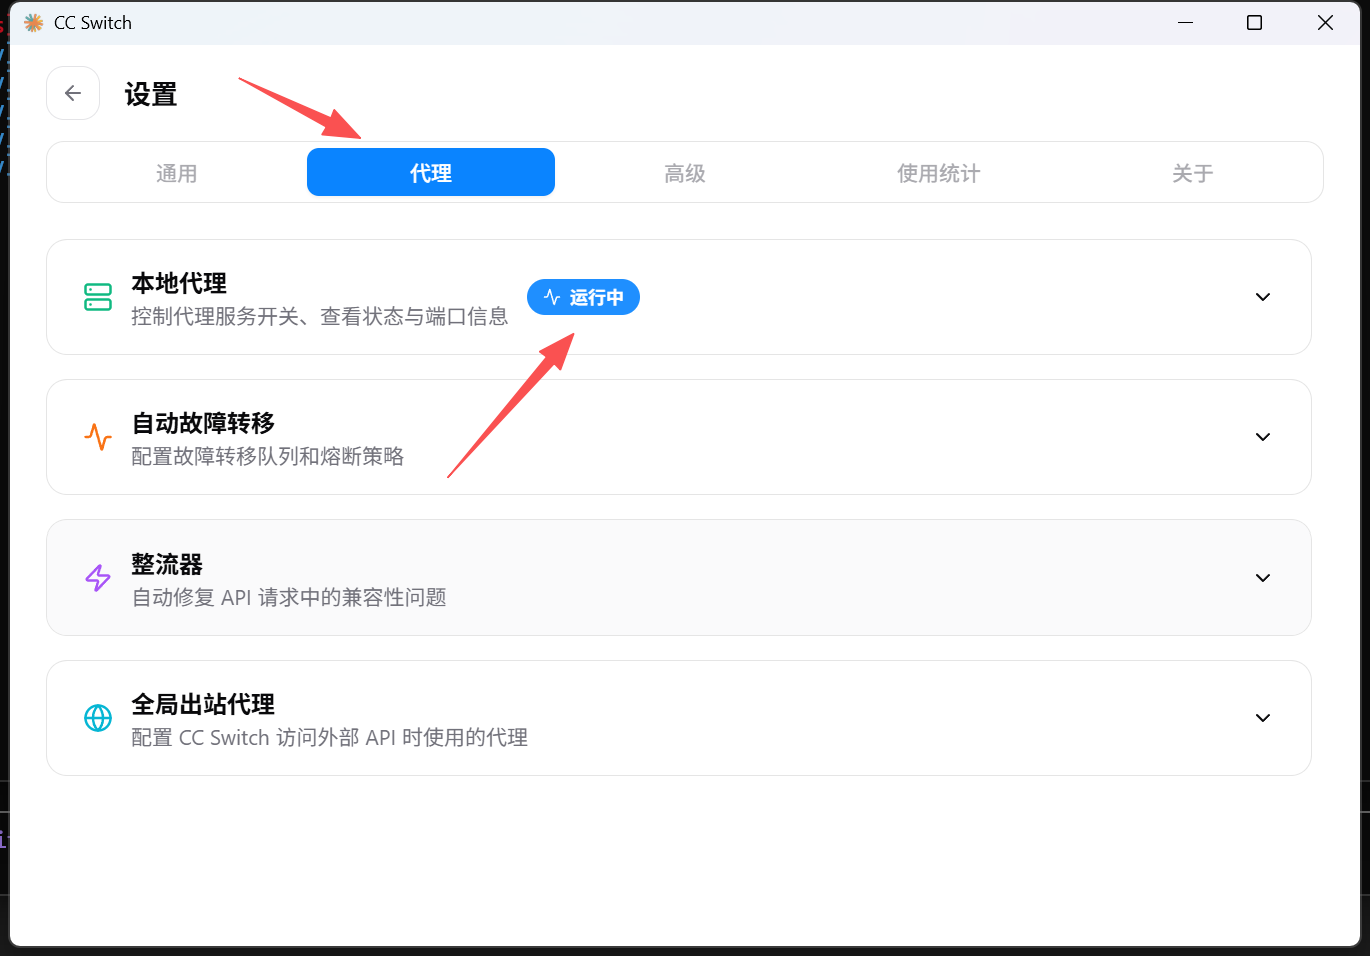 The Proxy tab in CC Switch settings. The Local Proxy status is “Running,…
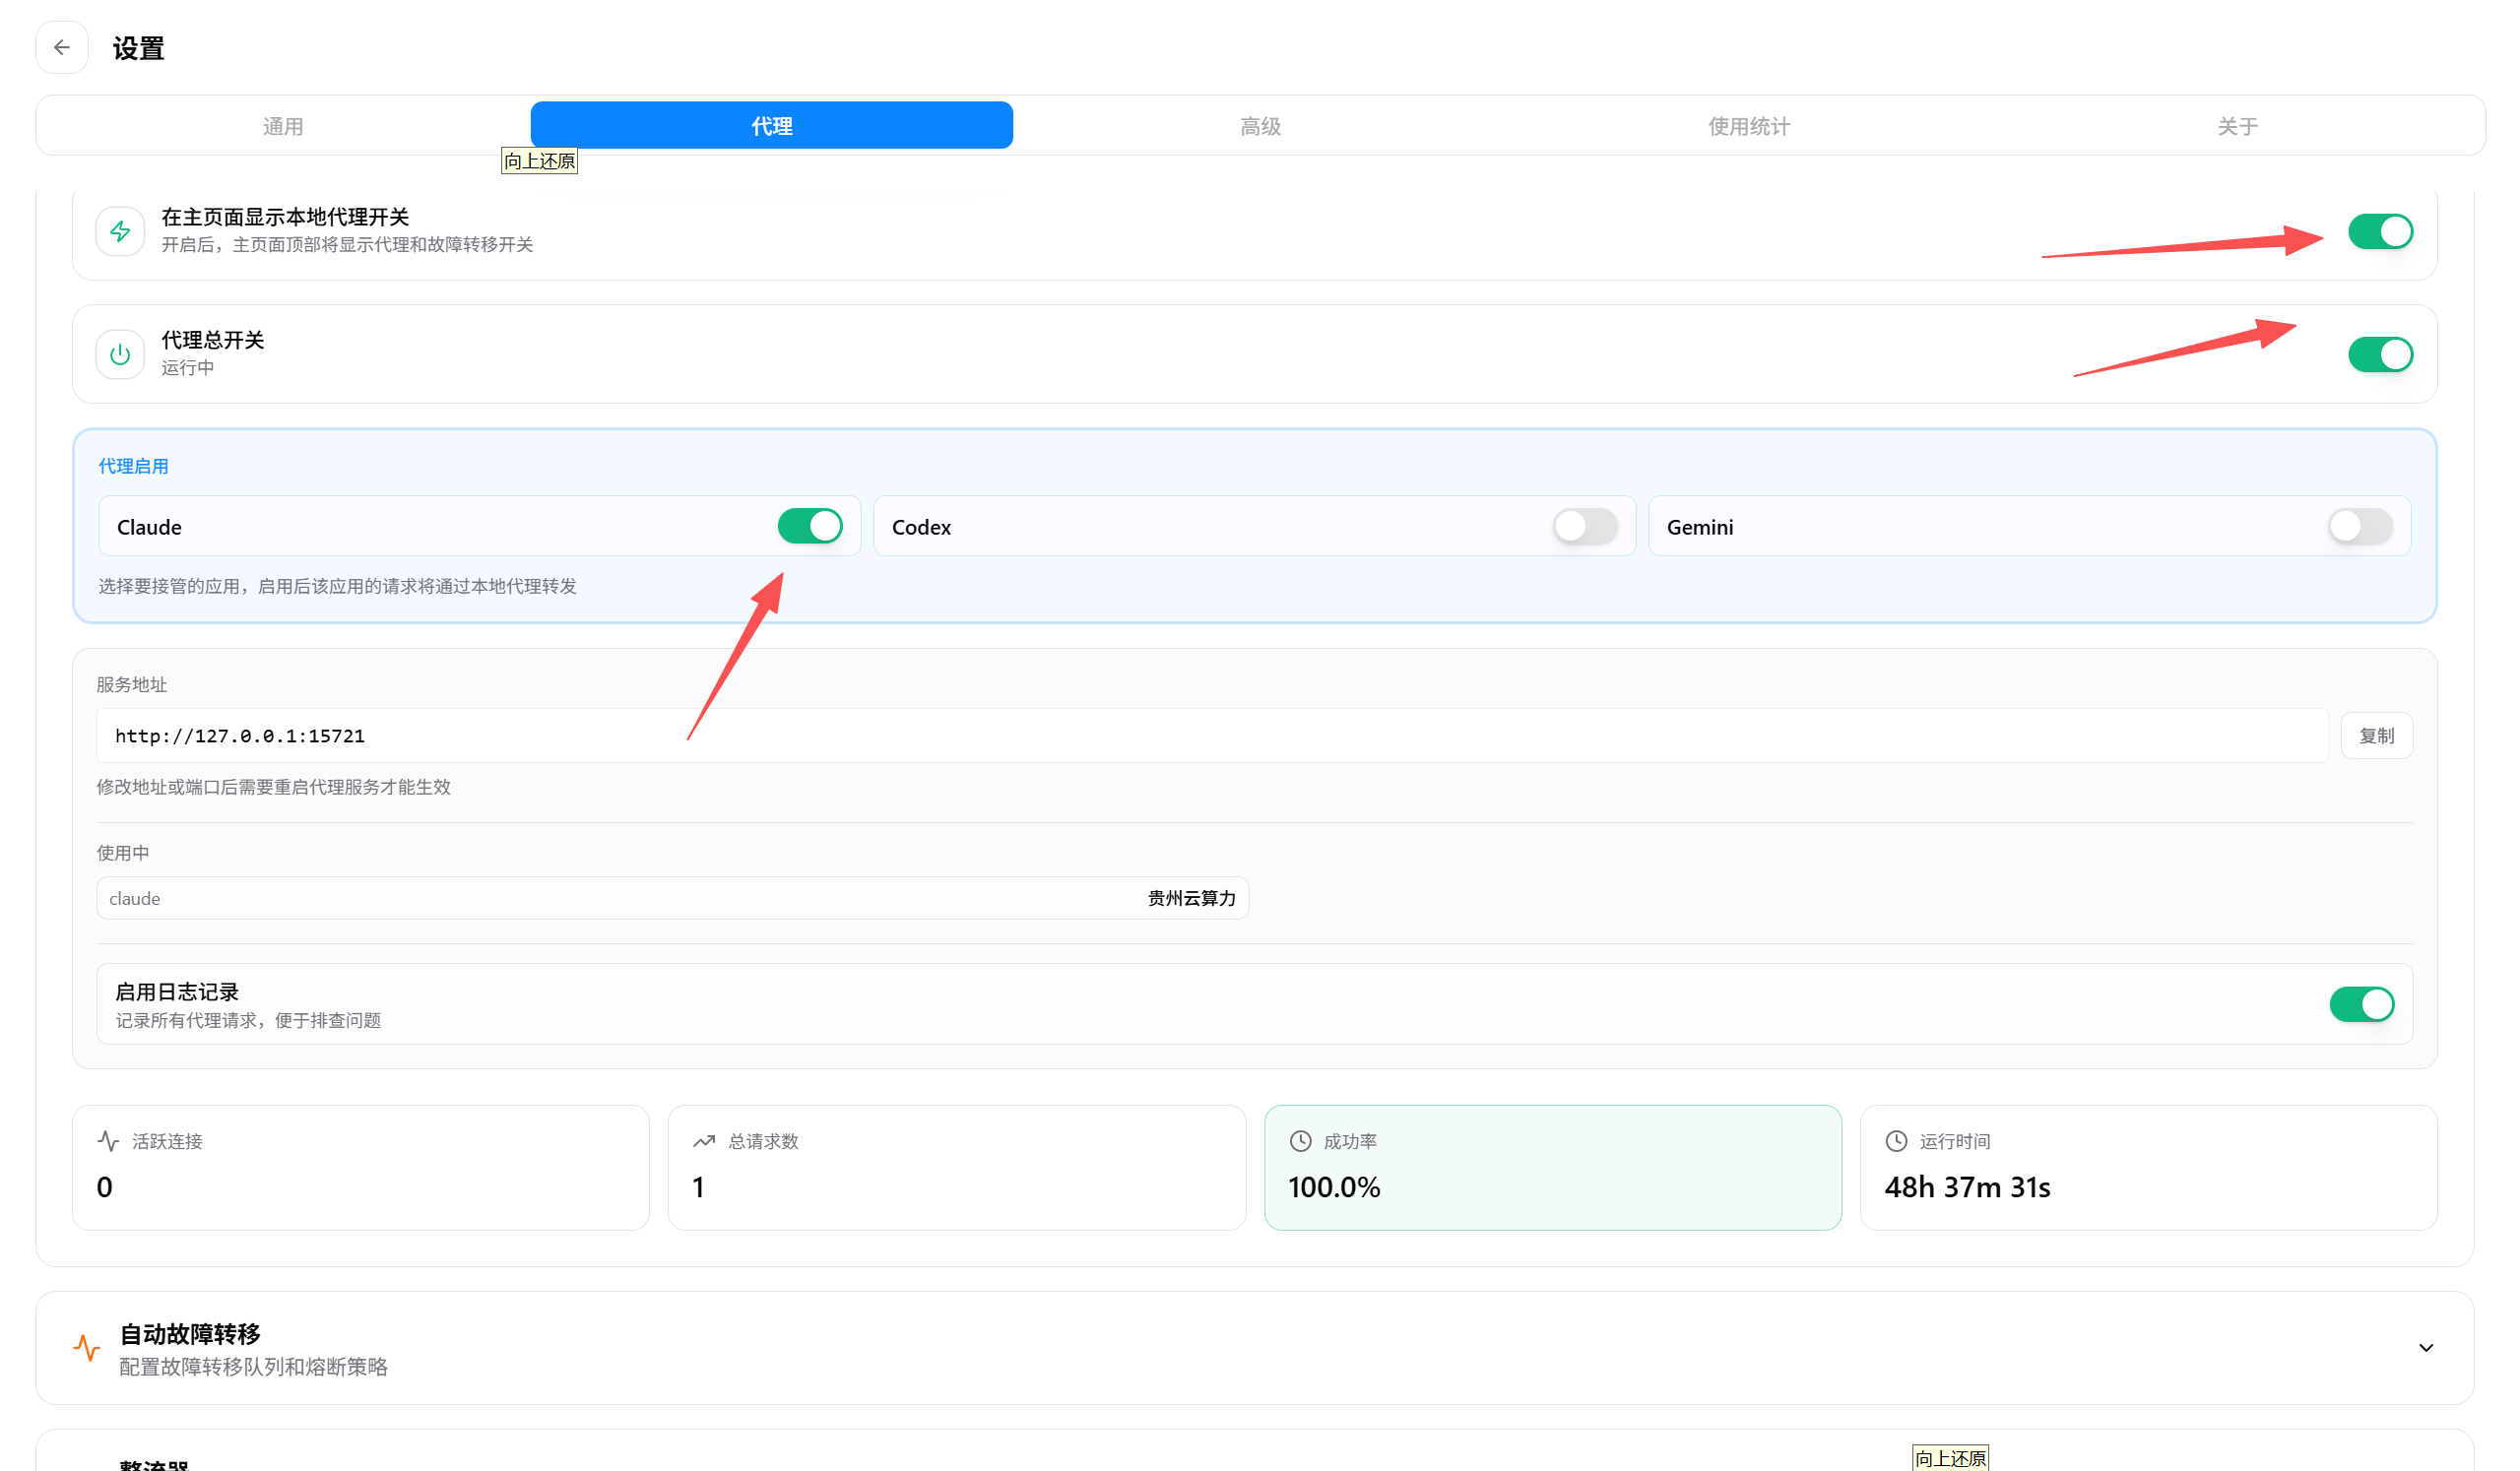 The Code tab on the Claude Code deployment guide’s Settings page. Naviga…
⌨️ Manual Command-Line Setup
If you do not use CC-Switch, you can configure Claude Code manually from the command line.
🖥️ Windows
System Requirements
Windows 10 or 11
Installation
Method One: Native Install (Recommended)
Using PowerShell:
irm https://claude.ai/install.ps1 | iexUsing CMD:
curl -fsSL https://claude.ai/install.cmd -o install.cmd && install.cmd && del install.cmdMethod Two: NPM Install (Not Recommended)
| ⚠️ Avoid installing with npm Updates to the npm package lag behind, so the installed version is usually older. Use the Native method above whenever possible. |
|---|
npm install -g @anthropic-ai/claude-codeVerify the installation:
claude --versionConfigure Environment Variables
For PowerShell:
[Environment]::SetEnvironmentVariable("ANTHROPIC_AUTH_TOKEN", "sk-xxx", "User")
[Environment]::SetEnvironmentVariable("ANTHROPIC_BASE_URL", "https://api.llm-token.cn", "User")
For CMD:
setx ANTHROPIC_AUTH_TOKEN "sk-xxx"
setx ANTHROPIC_BASE_URL "https://api.llm-token.cn"| 💡 Tip Replace sk-xxx with your own dedicated key. Restart your terminal after setup so the environment variables take effect. |
|---|
- Start Claude
In your terminal, use cd to open the project directory, or stay in any directory, and run claude to start.
🍏 macOS
System Requirements
MacOS 10.15 (Catalina) or later
Installation
Method One: Homebrew (Recommended)
brew install --cask claude-codeMethod Two: Curl Script
curl -fsSL https://claude.ai/install.sh | bashMethod Three: NPM Install (Not Recommended)
| ⚠️ Avoid installing with npm Updates to the npm package lag behind, so the installed version is usually older. Use the Native method above whenever possible. |
|---|
npm install -g @anthropic-ai/claude-codeVerify the Installation
claude -vA successful installation should return something like: 1.0.108 (Claude Code)
Configure Environment Variables
echo 'export ANTHROPIC_AUTH_TOKEN="sk-xxx"' >> ~/.zshrc
echo 'export ANTHROPIC_BASE_URL="https://api.llm-token.cn"' >> ~/.zshrc
source ~/.zshrc| 💡 Tip Replace sk-xxx with your own dedicated key. |
|---|
Restart the Terminal and Start Claude
After restarting your terminal, use cd to open the project directory, or stay in any directory, and run claude to start.
🐧 Linux
System Requirements
A Linux distribution (Ubuntu 18.04+, CentOS 7+, Debian 9+, etc.)
Installation
Method One: Curl Script (Recommended)
curl -fsSL https://claude.ai/install.sh | bashMethod Two: NPM Install (Not Recommended)
| ⚠️ Avoid installing with npm Updates to the npm package lag behind, so the installed version is usually older. Use the Native method above whenever possible. |
|---|
npm install -g @anthropic-ai/claude-codeVerify the Installation
claude -vConfigure Environment Variables
Ubuntu/Debian (Bash)
echo 'export ANTHROPIC_AUTH_TOKEN="sk-xxx"' >> ~/.bashrc
echo 'export ANTHROPIC_BASE_URL="https://api.llm-token.cn"' >> ~/.bashrc
source ~/.bashrc
Fedora/CentOS (Zsh)
echo 'export ANTHROPIC_AUTH_TOKEN="sk-xxx"' >> ~/.zshrc
echo 'export ANTHROPIC_BASE_URL="https://api.llm-token.cn"' >> ~/.zshrc
source ~/.zshrc| 💡 Tip Replace sk-xxx with your own dedicated key. |
|---|
Restart the Terminal and Start Claude
After restarting your terminal, use cd to open the project directory, or stay in any directory, and run claude to start.
Troubleshooting
Command Not Found?
- Confirm that Claude Code is installed correctly
- Check the PATH environment variable
- Restart the terminal window
Connection Failed?
- Check your network connection
- Confirm that the API Key is correct
- Check that your balance is sufficient